Wednesday, June 7, 2023

A jacket and a jacket


I thought about knitting something from a sewing pattern for a long time. Sewing patterns, if done right, fit well and are generally flattering. This is my major goal in knitting - to create something flattering and well fitting. And to try something new while doing it. From the beginning I knew that it was going to be a jacket. I just didn't know what kind of jacket to look for… And where…
Last October I was leafing through a Burda Style magazine in a book store and decided to buy it since there were several jacket patterns in it. The one that I ended up using doesn't look at all like my finished jacket. Yet, after studying all the patterns closely I picked it because I had this idea in my head of a jacket with visible seams assembled from pieces like a puzzle. Something sporty but classy with a street style vibe. The jacket pattern had just that: several rather smallish pieces that together were supposed to make a boxy, short, very structured blazer.

I had some doubts about the final result though. No, scratch that, I had lots and lots of doubts that I would be able to recreate all the pieces in my size and then sew them together neatly enough. Doubts deter progress, which is why for a while there was no progress whatsoever. Just doubts.

Still at some point (about 3 months later) I made a paper copy of the pattern parts in my size. It was surprisingly easy and didn't take lots of time or effort. Yet, I wasn't sure that I was moving in the right direction and decided to make at least the body of the jacket from muslin and try it on. Again, when I finally managed to do it (a month later), it didn't take much time. Sewn together the muslin parts didn't look like much but it gave me an idea how the finished garment would fit me.
Next I needed to pick a yarn for my jacket and I was pretty sure that I knew which one I wanted. Unfortunately, when I made a gauge, the fabric was too soft and pliable, it didn't have enough crispness and sturdiness for a jacket that I wanted. It happens to me all the time. I have a pattern in mind, buy a yarn for it, and after making a swatch discover that my yarn would not work for my pattern.

But I was already totally invested in making this jacket. So I dived into my bottomless stash and unearthed two (!!!) long time discontinued yarns - Rowan Scottish tweed and Lorna's Laces - which combined gave me the right amount of sturdiness, tweediness, and silkiness.
With a gauge of 23 rows and 16 sts in 10 cm on 4.5 mm/US 7 needles it was supposed to be a breeze. Right? Wrong. Because I decided to make a big swatch.

Actually, my swatch was huge, sleeve-sized. Why did I spend time on it? Because after blocking it, I could just pin pattern parts on it and calculate the needed number of stitches and rows easily.

There are not many straight lines in a jacket pattern, as I was surprised to learn. At least, not in this one. I had to constantly increase or decrease some stitches, and at some point use short rows to make a bend in the upper part of the front. Even though my ginormous swatch helped immensely with calculations, I still had to adjust and recalculate while knitting.

As soon as the back and side parts were finished I washed and blocked them. It gave me a reference point to finish the front parts and sleeves.
Small lifehacks:

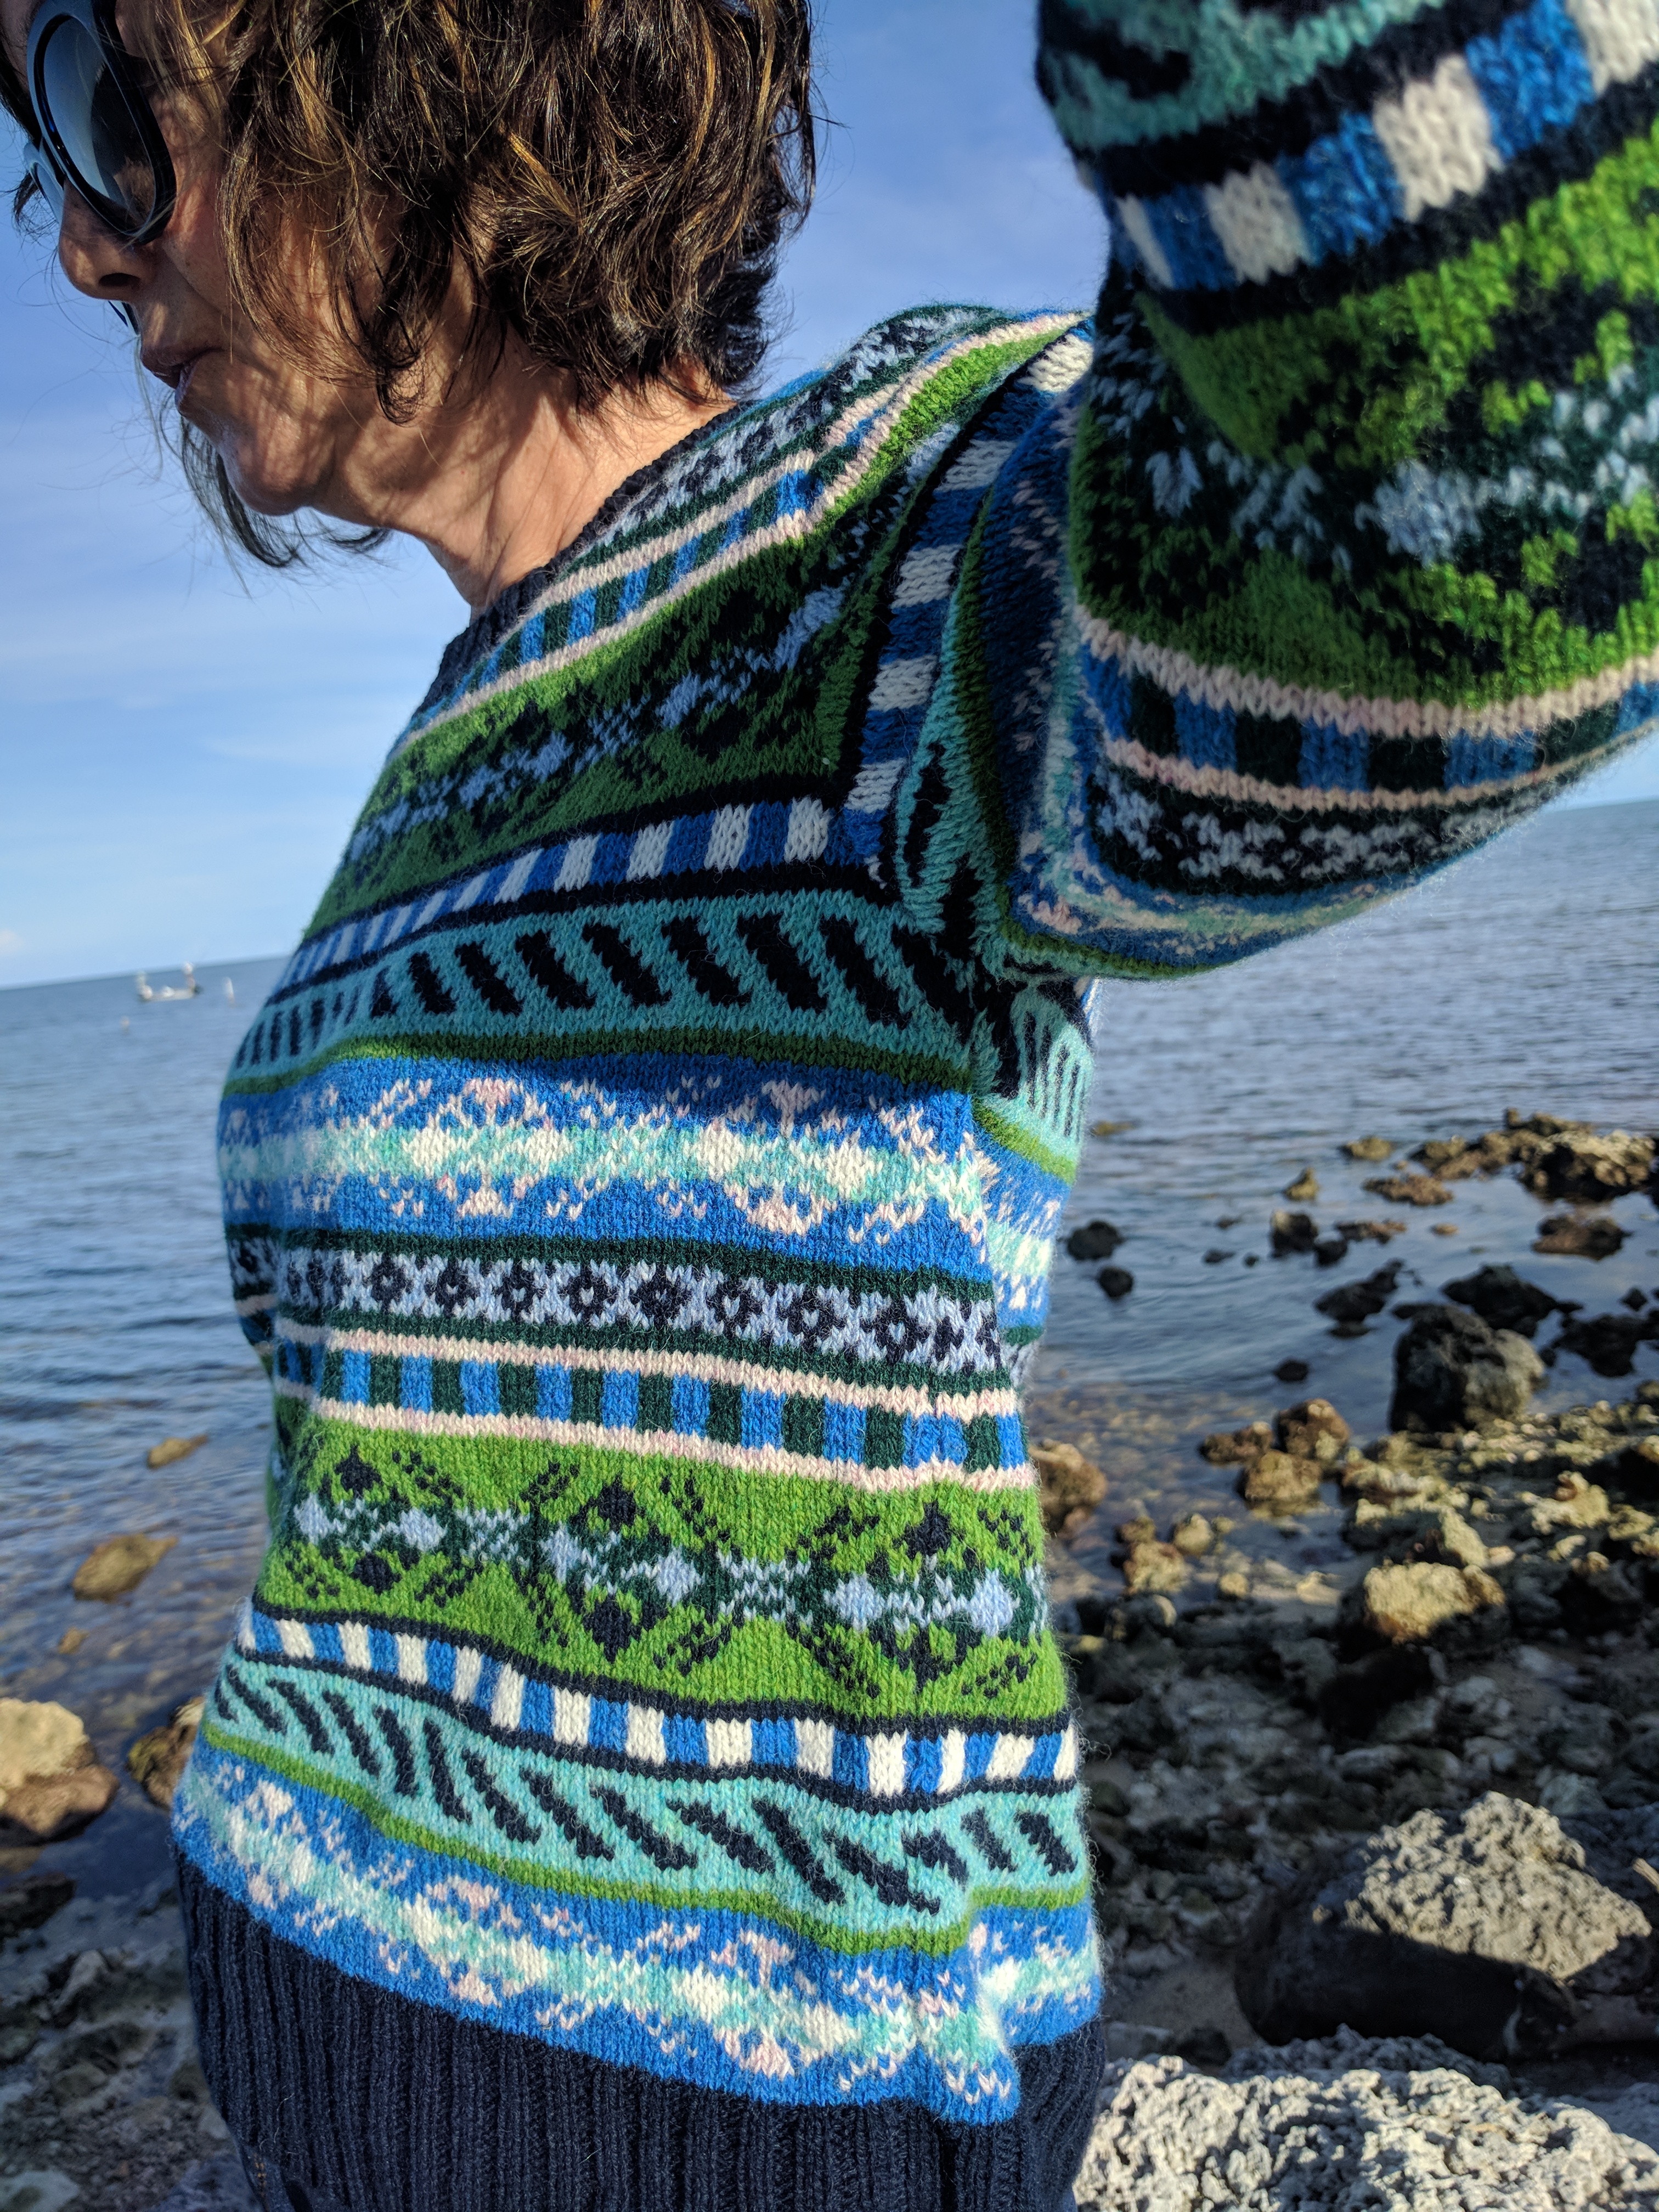
1) Since I wanted the wrong side of the stockinette to be the right side of the jacket, I started and finished each knit row with a purl stitch, and each purl row - with a knit stitch. This way it was much easier to sew the parts at the end and the seams look neat.

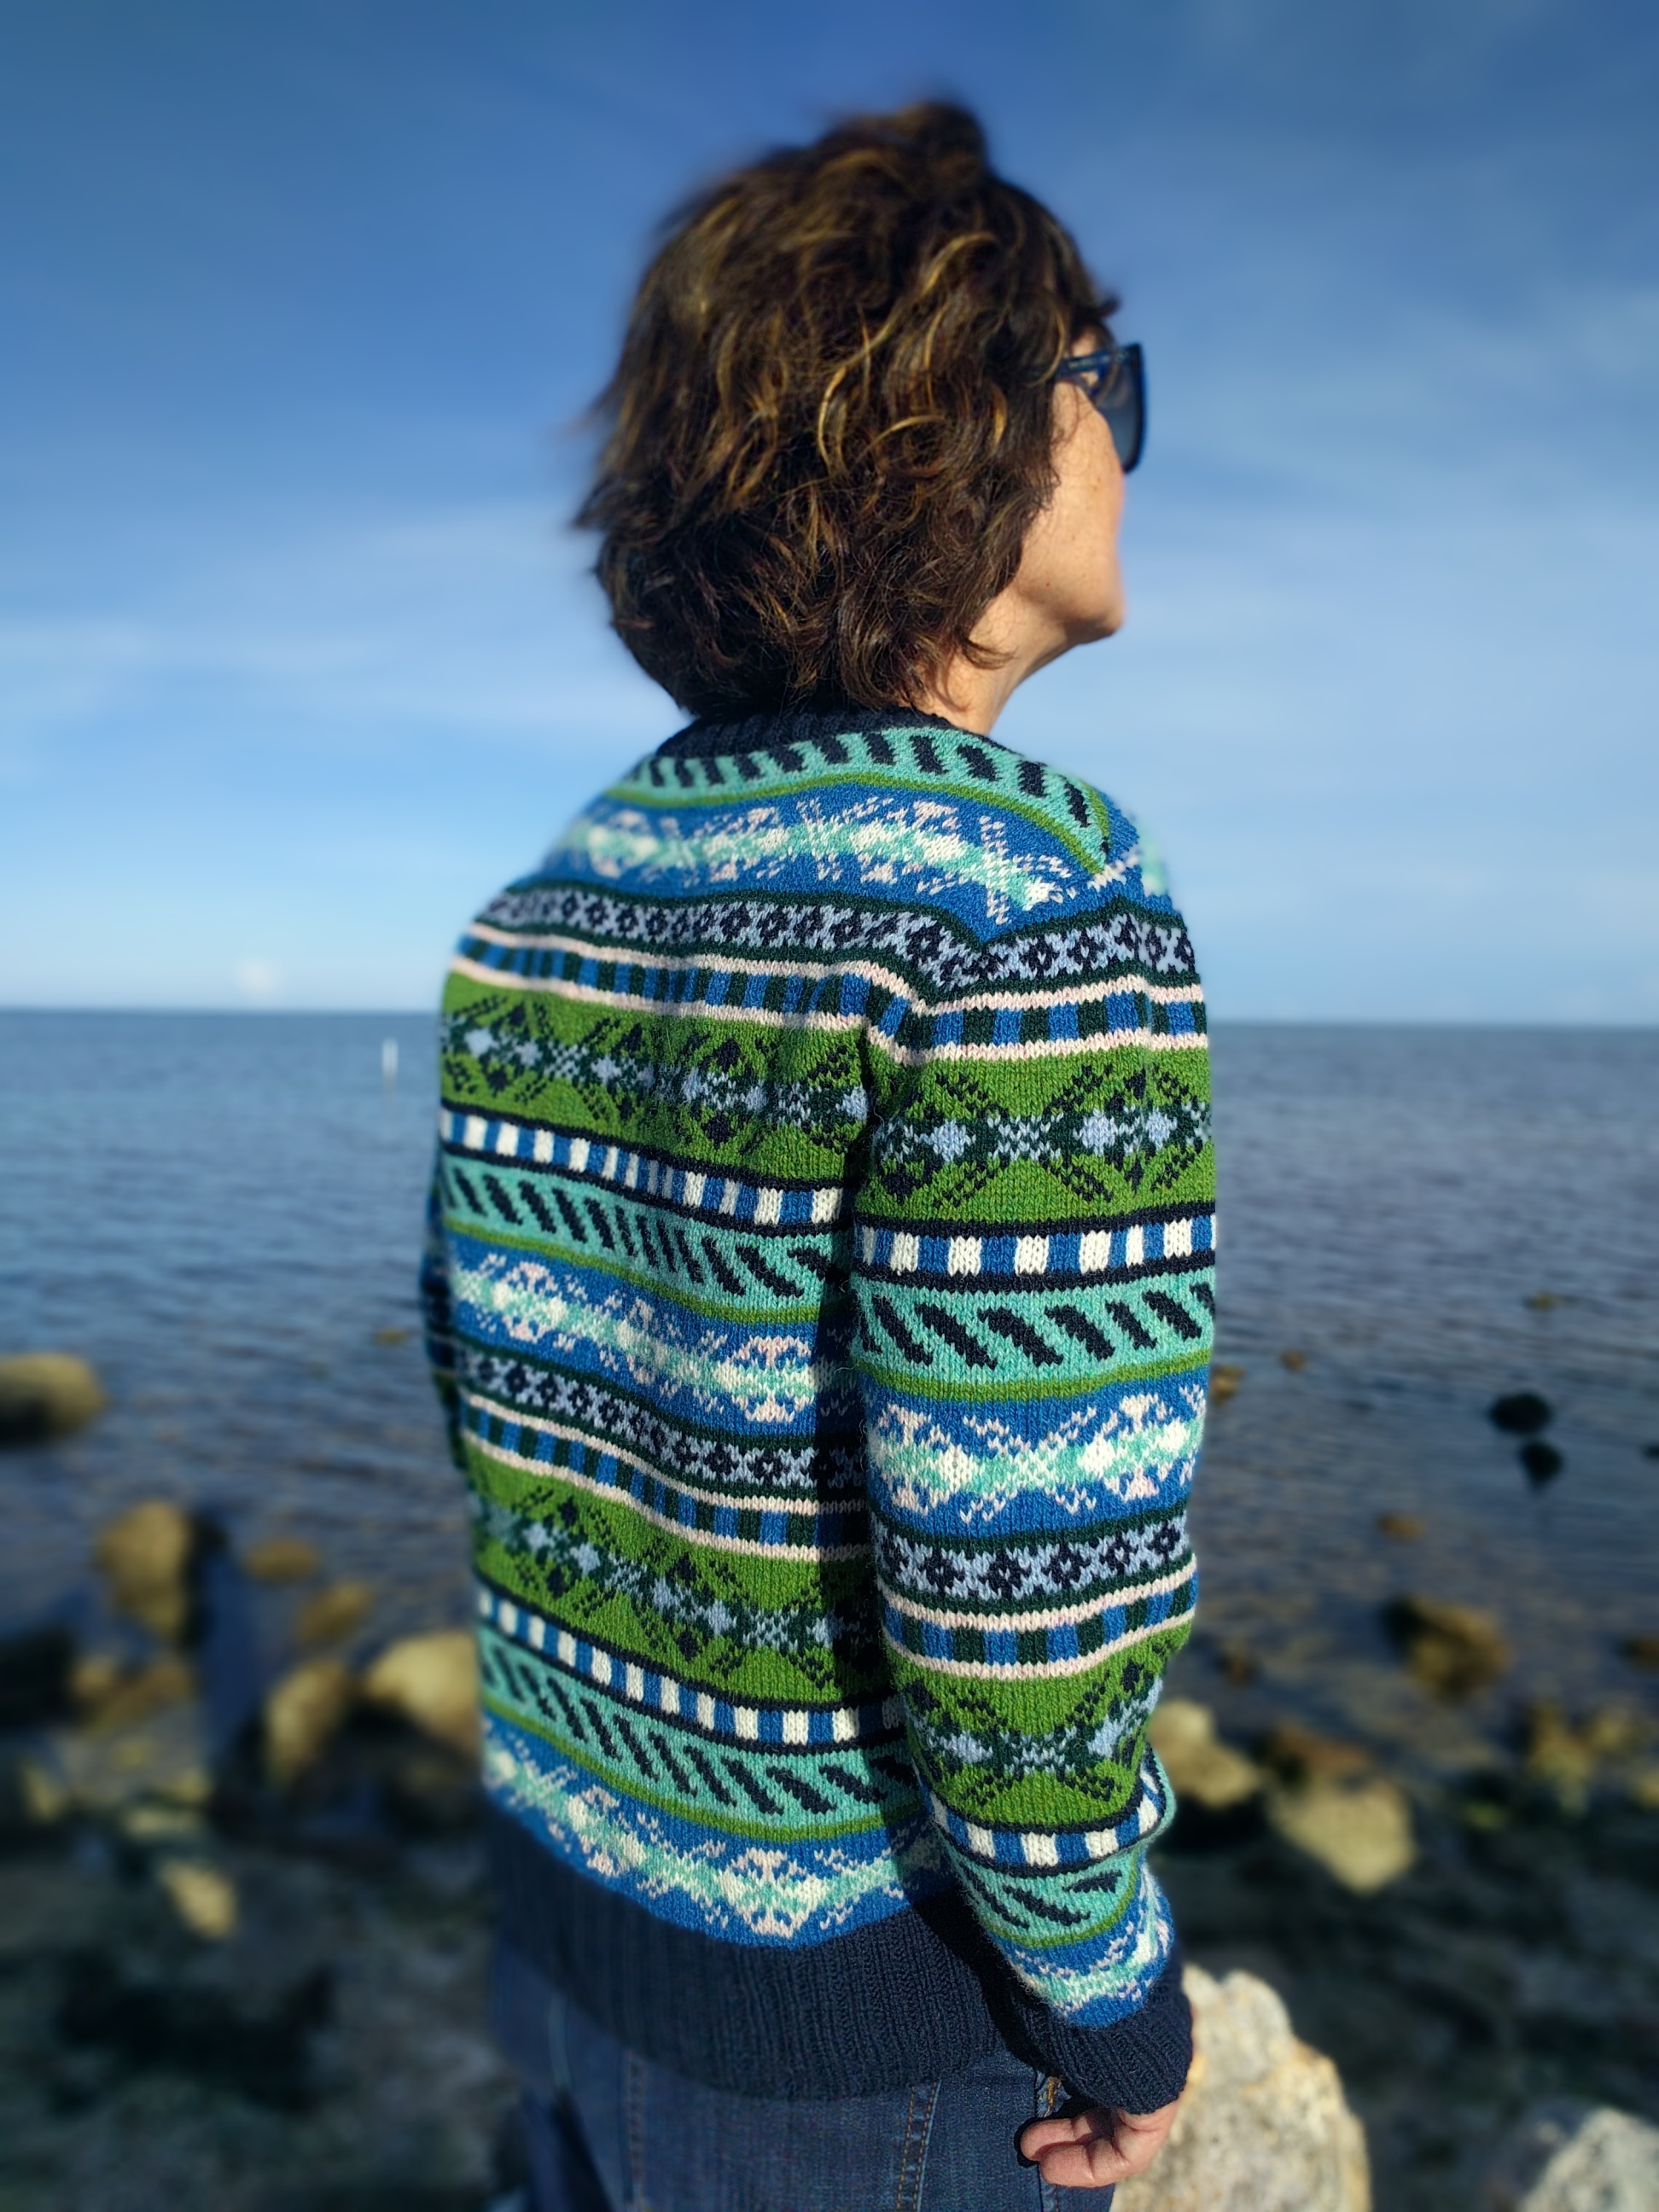
2) The back parts are 2 cm longer than the fronts and you can see the shoulder seam. It accommodates my slouchiness, makes the jacket fit better without pulling up at the back.

3) The upper parts of the sleeves are not symmetrical, there are more decreases on one side (front) and less on the other (back). It worked better this way, because the back and front armhole increases were not symmetrical either.
The jacket is short and boxy, Chanel style. Its finishing was going to make or break the final look. I opted for a simple 3 sts I-cord finishing all over. It was reflecting the jacket seams, and gave it even more structure. For the neckline I picked up stitches from both sides (right and wrong), knit 3 rows on two sets of identical needles (about a size smaller than the main needles), and then sewed them together with a kitchener stitch.
Voila! My jacket was ready.

I tried it on and discovered that the sleeves were a bit too long for me and the whole thing was a bit too roomy. Yes, after all my struggles, worries, and multiple calculations some things still didn't work:((( So I turned the sleeves up (have I told you that I made this jacket completely reversible?) and moved the buttons a little further left.
I am proud of what I achieved because I had to overcome lots of worries and doubts.

The moral of the story: even if in doubt, move forward, one step at a time, and eventually (in a year, or two) you'll get there. Just keep working!
Now, I had a finished jacket and some leftover yarns - Rowan Scottish tweed and Lorna's Laces - that look great in a jacket.

To be honest, at first I wanted to make another garment from a sewing pattern right away. My choice was a waistcoat, with visible seams as well. I thought that it would be complementary to the jacket. But then I discarded that idea. I wouldn't be able to wear them together anyway - too bulky, or I had to use a different yarn which totally defeated the purpose.

At some point, while looking for an appropriate pattern, I saw this one - a jacket, again Chanel style, in an old Phildar.
I couldn't make it in one color which was good because I didn't have enough yarn to make it this way. Now I needed three more yarns in complementary colors if I wanted to make this pattern.

First, I had two balls of Mohair (70% mohair, 30% shetland) from Annfield Farm, 230 meters each, that I bought last year during Perth Festival of yarn. It was my first time with this vendor. I liked how their yarns looked but couldn't predict how it would behave while knitted. Doubled, this yarn gave me approximately the same gauge as my combined Scottish tweed and Lorna's Laces. I decided that it was going to be my "star" yarn in this combo.

I also found some old wool in yellowish ivory and dark gray, unraveled from my previous knits. Used solo, they were too thin, so each color needed a companion - a lace wool in ivory for the first one and a lace cashmere in black for the second. I made a swatch with all the yarns doubled and it looked perfect.
Now I had 8 balls of different yarns to work with. It is not easy to work with multiple balls - hard to unravel and definitely not portable. To simplify things I balled them all together by two. I know, it wasn't the best solution - there is always a surplus of one of the threads, and you either carry it on till the end, or cut it and create a knot. This time I had to carry threads of surplus yarns to the balls' ends because I had enough knots already in the used old yarns.

Again, with the gauge of 24 rows and 15 sts in 10 cm on 4 mm/US 6 needles, the work went quickly. My only change to the pattern were sleeves. The original pattern has ¾ sleeves and flappy vents that I didn't like. I decided to recreate classic jacket vents with buttons - something that I'd never done before. Yey!!!
When all the parts were sewn together I needed to pick the finishing. A friend of mine - @sveta_lana_ch on IG, who is extremely knowledgeable about all kinds of knitting techniques - recommended a new way of finishing using a crochet hook.

Since the fabric created by this kind of finishing is doubled it must be done with smaller needles and thinner yarn. No problem in my case - I divided the Mohair yarn used doubled for the body, and had just enough to knit all the borders.

How to make this neat and classy finish?

First you need to make a chain of crochet stitches along the borders.
Then you pick up in each stitch of the chain on a needle 2 sizes smaller than the one used for the body.
With thinner yarn make 5-6 rows of stockinette and leave stitches on the needle. Using a crochet hook cast off live stitches from the wrong side.
It does sound complicated because it is complicated. I had to watch a video several times and still went through several unravelings and lost stitches. I found a video under #кеттлевка on IG. I couldn't find a good translation for this word in English and no video with an English speaker. Fortunately, you don't need words, just seeing is enough to understand this method.

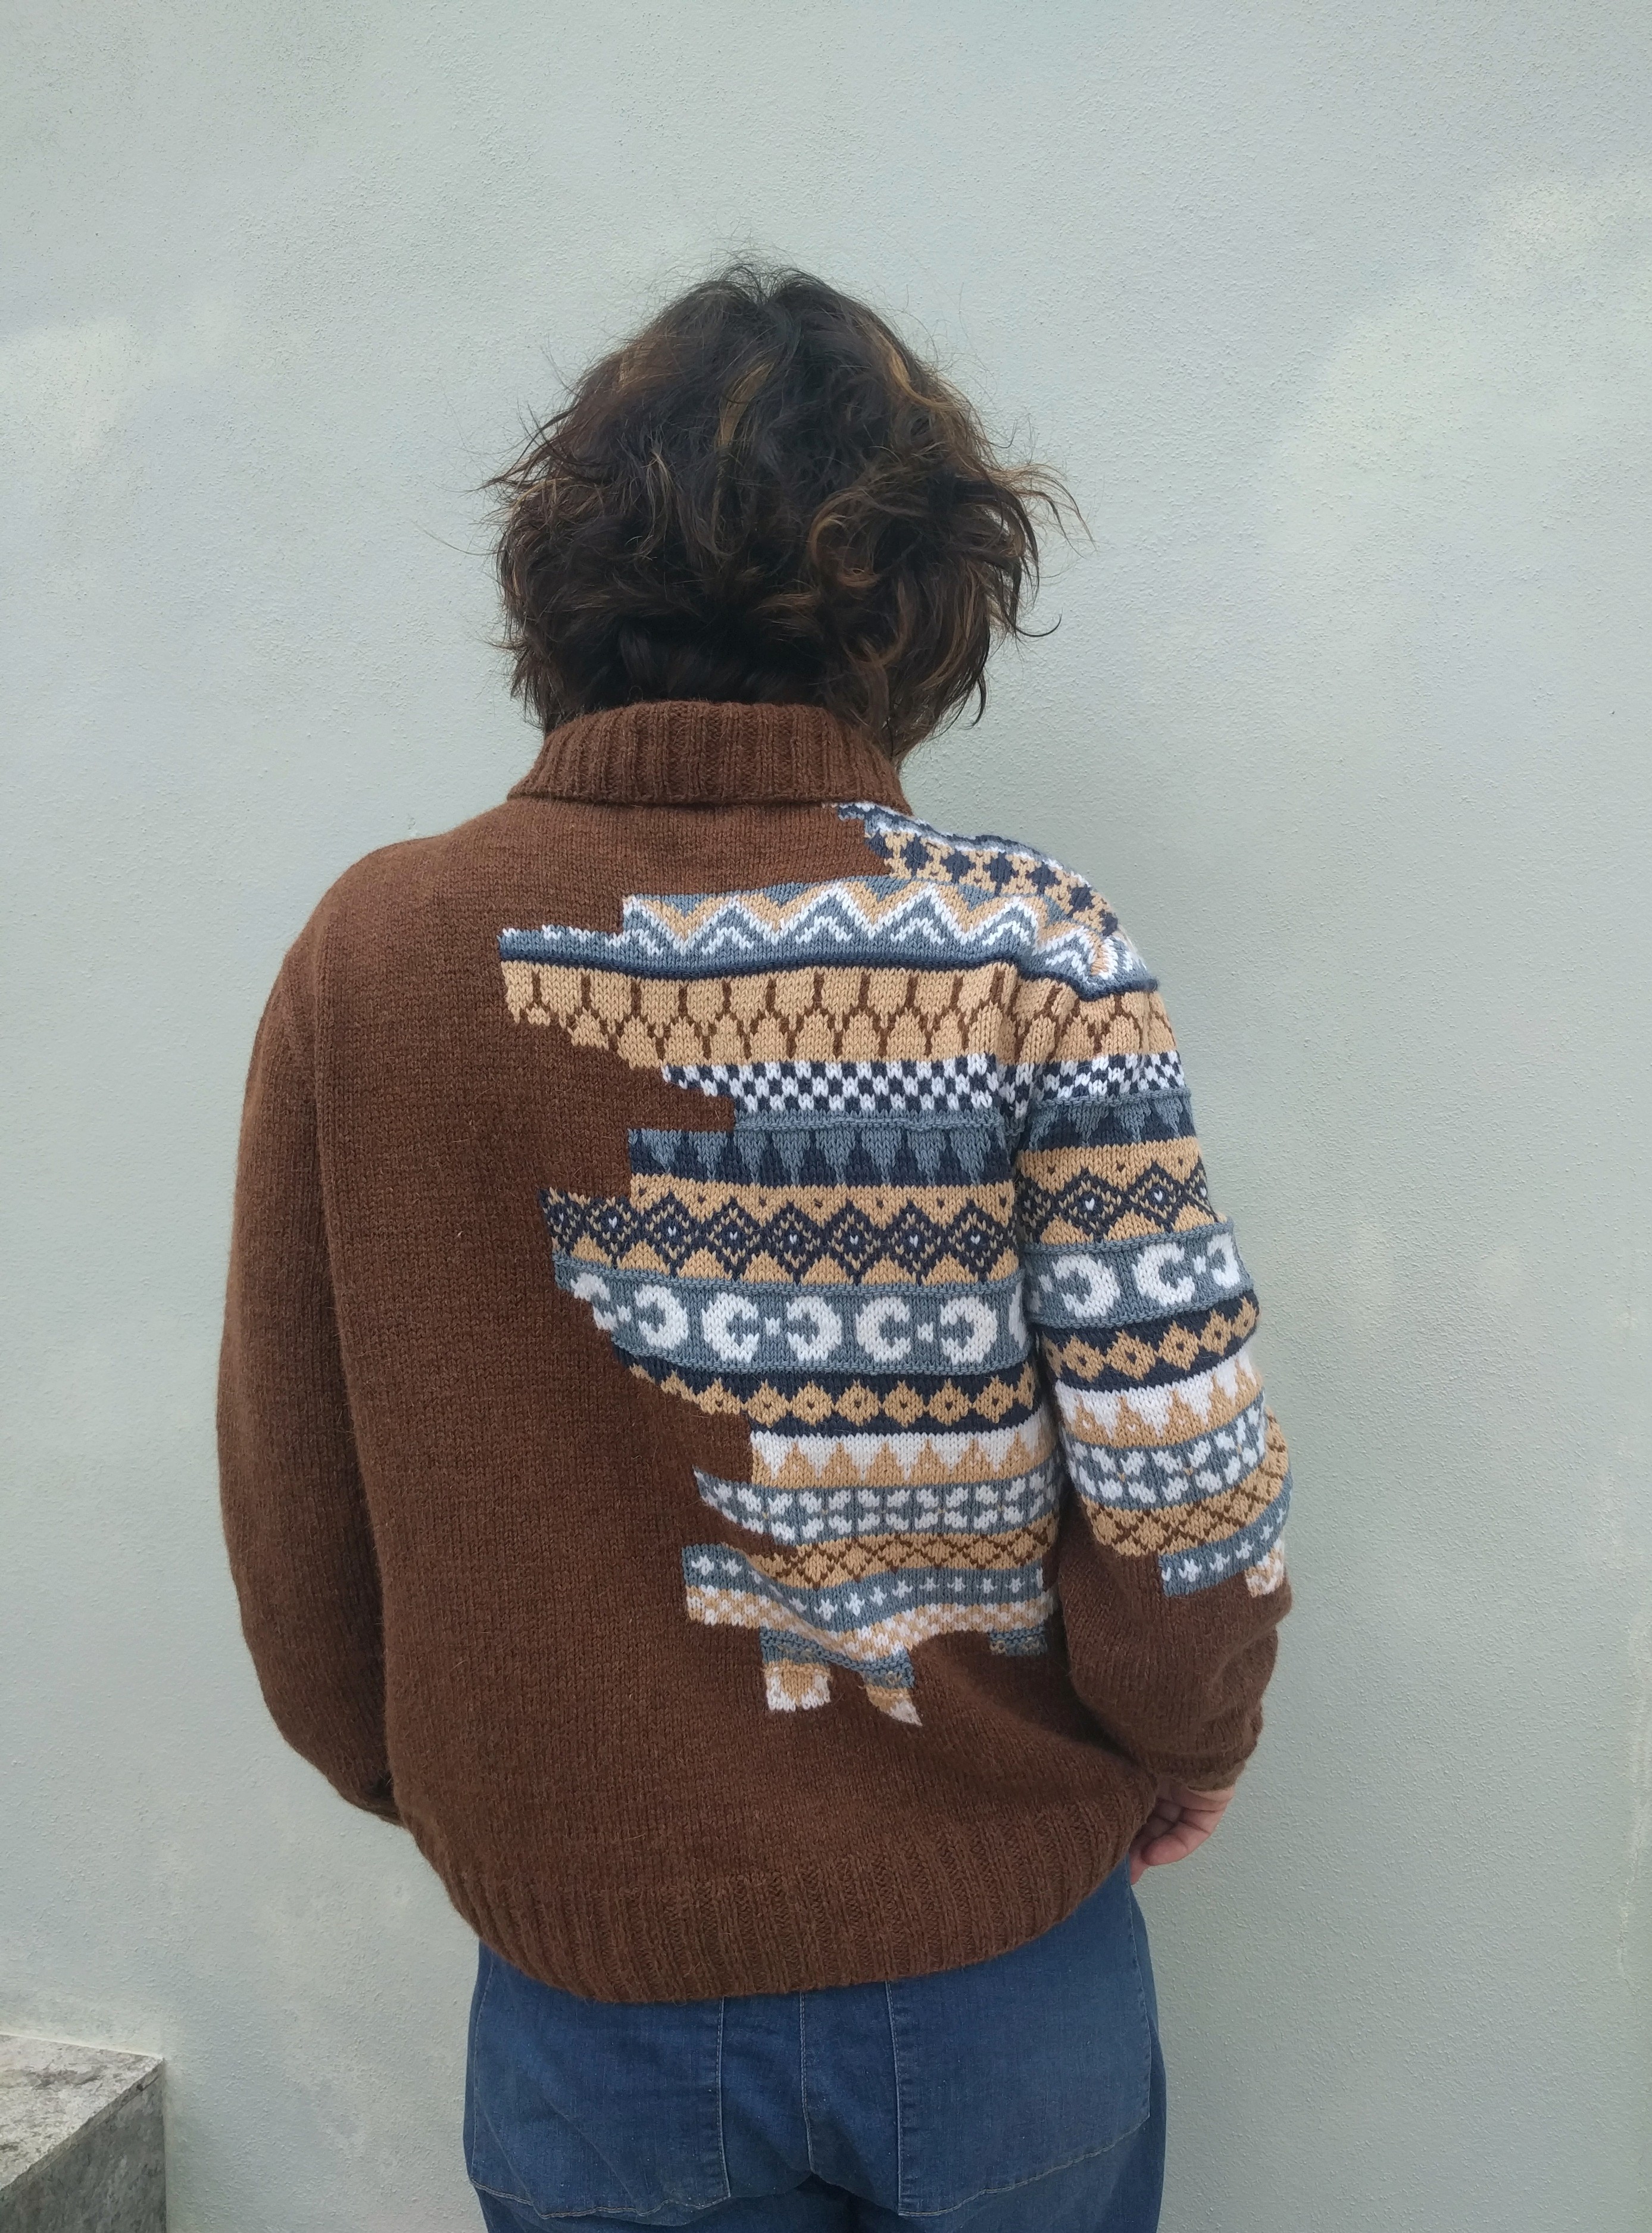
And this is how I finished my second jacket in a row (again, don't forget, the back is 2 cm longer than the front).

Now I am not afraid of trying a sewing pattern for knitting and I've got several lined up for when I am back to Florida in October.

And I am going to make more Chanel style jackets/blazers (yes, I am not ashamed to use this name here) because I conquered the tricky finish which makes the whole thing look polished.

As for my knitting plans for Scotland, I am taking with me very little yarn and I am planning on making some simple basic clothes to wear in chilly weather. At least, that was my plan till I saw this FREE pattern on Ravelry. So tempting: you can make it well fitted and boy, I didn't try crocheting for years!


Friday, April 21, 2023

Saddle shoulder

For the last six months or so I was knitting projects with saddle shoulder sleeves. Saddle shoulder is a variation on raglan construction. The difference with raglan is that there are no even decreases along the armhole. The round top of the sleeve is a bit shorter than usual with a straight strip along the shoulder (like a saddle) to the neckline.

Why am I so fixated on this particular construction? The main reason - because it fits me really well. At least I like myself better in designs with saddle shoulders. 

This type of construction is traditionally used for men's clothes because men have (at least in general) broad shoulders and it accentuates them nicely. Maybe it's a faint reminder of military uniforms.  Since I started swimming regularly, my shoulders have grown about 2 sizes up. Lots of my tops and dresses don't fit me anymore, or are extremely tight in shoulders. But, I believe, the manly saddle shoulder sweaters and cardigans are now fitting me much better.

It is not easy to find a pattern with saddle shoulders. CORRECTION: it is not easy to find a good pattern with saddle shoulders where all the math is accurate and you have no problems fitting sleeves into the body. As I've mentioned already, it would usually be a pattern for men which are not easy to find on Ravelry, so I turned to my collection of old knitting magazines. In the old Phildars saddle shoulder patterns are modeled almost exclusively by men, but at least there are several of them, for different yarns and gauges. Sometimes, though, there is a feminine pattern with saddle shoulder construction (mostly for a cardigan). And that was my first choice.

I had bought linen yarn from the Midwinter Yarns in different colors, one of them being a rather bright pink. I love this store and their yarns for two reasons: yarns are good quality, and dyes are solid, colors don't bleed while washed. So I stacked up on their "summery" yarn (Lithuanian linen) hoping to make things for Florida. I used the mossy green first.
Loved the result but it was too big on me, and looked much better on my sister-in-law. Bummer! 

Then I used the cobalt one together with very thin Todd and Duncan cashmere. This one turned out exactly as imagined and I wore it all the time this winter.

Now it was the turn of the last linen yarn left - the bright pink. This Lithuanian linen is fingering weight, so I prefer to use it doubled. Plus I added one more thread of yarn - ColourMart Linen/ramie also in fingering weight - to "tame" the color a little bit, make it look not so bright. I had to use small size needles (2.25 mm/US 1) because otherwise the fabric was too porous and uneven.
I found a rare saddle shoulder pattern for a woman's cardigan in one of the old Phildars (see the picture above). My gauge was similar and I decided to use that pattern as a template (more details on the pattern page). I changed lots of things in this pattern - the main design, sleeve and body length, reverse stockinette instead of the regular one for the sleeves but I kept all the numbers for the increases and decreases, so the saddle shoulders sleeves would work with the front and back. And they did!
The sewing went smoothly and the end result is lovely and wearable (even in this unusual color). Actually, I liked the fit of this cardigan so much that it prompted me to look for other saddle shoulder patterns to try. And I soon found one in another old Phildar that I used for a stash busting project - a striped t-shirt.

I have mixed feelings about this one. On one hand it was fun to make and it looks cute on me. The construction proved to be immaculate as well. Again, sewing the parts together was not a problem (if you don't count the stripe matching - that was a real pain!).

The yarn is cheap and extremely soft, with no "body". It doesn't keep any shape or form. I was lucky to use this complicated construction since it provides at least some "bones", a carcass to the flowy, shapeless fabric. Yet, it is going to stretch with wear, I am sure. I should've made it shorter, giving it room for growing. Now, I will end up with a mini dress after several wears, which was not my goal:(((

In January I started planning my wardrobe for the upcoming trip to London and discovered that I left almost all my warm sweaters in Scotland. 

My solution was to make a couple of sweaters promptly. And I picked a saddle shoulder construction again, but this time for a seamless top down knit. I thought that it would be neat to compare and contrast two ways of making the same thing.

I chose Versal as my first top down pattern for one simple reason - I had a yarn (or rather two yarns combined) with the same gauge in stockinette. Only while working on this sweater did I discover how clever and simple the pattern is. Moreover, the designer treats us, knitters,  with the utmost respect and gives several finishing choices. At the same time, there are no excessive details, links to videos, explanations of knitting techniques. The pattern is compact and clear and I followed it without any changes. More details on my project page on Ravelry.

For the second top down seamless sweater I chose to reknit Navagio in a bigger size. First, because I liked the pattern when I was making it the first time. Second, because I wanted to experiment not only with the saddle shoulder but with volume as well and see if the change in size will change the overall fit.

Again, I almost didn't change anything in the pattern this time - knit all in the round without seams. Again, more details on the project page on Ravelry.

I wore both top down sweaters in London for two weeks and now can report the differences with saddle shoulder patterns that are bottom up and seamed.

There are definitely differences in fit. A top down sweater fits well in shoulders and doesn't need any adjustments when you stand or walk. As soon as you sit down, everything sort of crumbles and you have to make at least minor adjustments (in my case, fewer with Versal, more with Navagio II) to put the sweater back in place when you stand up. There are no such problems for the sweaters knit from the bottom up and seamed.

Top down sweaters are easier and faster to make. The downside - they are stretchy and lose their initial form and shape quickly. My Versal has grown by about 2 sizes already. Navagio II was really oversized to begin with so the growth was not that visible. Still, it was a big disappointment because I like Versal a lot and was planning on wearing it next fall. Maybe my husband can wear it now?..

Anyway, my next and so far my last project is a seamed sweater with a combination of raglan and saddle shoulder sleeves. Remember this cardigan, a ME+EM spin off?

I based it on a cardigan pattern from an old Phildar. Since I like the final fit a lot I decided to use the same pattern with modifications and make a plain simple sweater with high collar (high collars proved to be practical in colder climates) using some ColourMart cashmere in bright red that didn't need any adornments. Plus I've been on a "plain sweaters streak" lately.
My only problem with this sweater was that you cannot make fast progress on size 2.25 mm/US 1 needles. I took notes while working on it hoping to use them later if I like the result. I do like the result and you can find my notes on the project page on Ravelry. I will definitely return to this pattern, maybe with some modifications (I cannot make anything without modifications).

Now, what did I learn from all the experiments?

1. Top-down seamless sweaters with saddle shoulders are much faster to knit.

2. Top-down seamless sweaters with saddle shoulders don't keep their shape - they stretch with wear and they don't stay put when you sit down.

3. You can find all kinds of saddle shoulder patterns in the old Phildar magazines. They are well calculated and will be easy to put together if you get a matching gauge. By the way, there are more and more new saddle shoulder patterns on Ravelry. Sadly, almost all of them are top down seamless.

4. I love how saddle shoulder sweaters and cardigans fit me and am going to make more of them in the future. Probably, I'll stick with bottom up seamed constructions.

5. There is nothing bad in repeating the same pattern. On the contrary, it opens new possibilities for improvement and experiment (and modifications!!!). Plus familiarity with a pattern makes you feel comfortable and at ease.

6. Men's knitting patterns can be used for women - you just need to pick the right size, yarn, and needles. I already wrote about it here.

7. Do not be afraid of bottom up seamed saddle shoulder patterns. If they are good of course…


Sunday, February 5, 2023

Knitting stripes


Why do knitters like stripes?
That's easy - because it's fun to knit. Instead of falling asleep bored by the rows of endless stockinette stitches you just keep anticipating a color change. You tell yourself - OK, one more row and I start with red (light blue, green, etc.) yarn - and are going and going. It's really addictive.

There are other benefits of knitting striped garments. It is handy when you have small quantities of yarn of the same gauge. This is usually what comes to my mind when I take a look at my enormous stash. Striped knits are good for stash busting.

Unlike fair isle or intarsia, striped knitting doesn't require any special techniques and it can be done while talking or watching TV.

What else? I think the most important advantage is their versatility and wearability. It is easy to combine a garment that has several colors. At least for me with my predilection for dark (usually black) jeans and pants.

Everything else about striped knits is unpleasant to say the least. Sometimes it's really painful.

First and foremost, the innumerous ends that you will need to hide at the end of work. Because even if you knit in the round it won't be possible to keep each thread of yarn till the end without cutting.

Then there is the need to match all the stripes on the body and sleeves.
Again, it is easier to do while working in a round, but still you need to know how to avoid a jog - a little step that appears every time you change a color. The Internet is full of tutorials of how to achieve a "jogless jog" and it is not a mind blowingly difficult technique. 
Yet, if you are like me and prefer knitting with seams to insure that your final garment keeps its shape a bit longer (and adds some shape to your aging body), you will live through a nightmare every time while sewing the parts together. I for example can never get through a seam matching all the stripes the first time. I need two or three attempts to make it work.

This task becomes even more arduous when you sew in sleeves. I do like the end result for sure but going through this process is not my favorite pastime to say the least.
Last summer I made a striped cropped sweater from some odd balls of ColourMart's cashmere lace - some of them doubled, some tripled - in seven colors similar to the pattern that I found in an old Georges Picaud magazine.
Since I was dealing with cashmere - soft and weightless - I worked bottom up with seams to give it structure. I couldn't follow the pattern from Georges Picaud because I didn't have enough yarn. Hence, my pattern was totally improvised. I made the back 2 cm longer than the front like in my previous sweater (to accommodate for my body shape) and managed to sew them together in a way that it doesn't look weird. But then I encountered a huge problem - the ball of bottle green yarn was so tiny that it was obviously not enough for two long sleeves.
I came up with a solution to this problem - and I am very proud of my solution but as a result the finishing took me additional two weeks so if you decide to replicate my way of knitting, be prepared.

First, using a provisional cast on I picked up the amount of stitches for the largest part of a sleeve, right before the armhole decreases. Started with the last stripe before the decreases. Then did all the decreases for the sleeve's top. Then picked up the stitches on the bottom and went down the sleeve, decreasing stitches gradually. Finished with 1x1 ribbing in red and a tubular cast off. I had to follow the same color order as for the body only for the top sleeve and could improvise with the bottom part, changing the stripes order a bit, and using less bottle green (I ended up using the ball up completely).
And then came the seaming process. The purl side is the right one in this sweater and it turns out that sewing together two purled striped sides is much more difficult than two knitted striped sides. Needless to say that when all the stripes were matched, and everything was finished, I just couldn't make myself hide all the ends. There were too many of them and I was exhausted by this project. I don't care though, because nobody can see these ends but me. Otherwise this sweater is great - it fits me well and is perfect for Scottish capricious weather. Which is why I wore it quite a lot last summer and the ribbing became a bit stretched and wobbly. Keep it in mind - ribbing in cashmere stretches!
After this herculean task I managed to avoid stripes for a while. Till this January when I came across some cotton yarn in my stash that I totally forgot about. The yarn is called Peria. It is 50% bambu, 40% viscose, and 10% linen, 230 m/245 yds in a 50 g ball.
I don't remember when I bought it but I remember why I did it - it was extremely cheap plus I liked the colors. When I opened the parcel with the yarn, I discovered that it was too thin to use solo, and I didn't order enough for a whole garment if used doubled. Instead of ordering more of it, like normal people would do, I just hid it in a bin because it looked so thin, light, and soft, that I couldn't imagine ever making anything from it.

Fast-forward several years, I unearthed the yarn, rewound it doubled, made a gauge (still seemed too small), and hid it back again.

Now, as you probably remember, every new year my only resolution is to use up my knitting stash. In January I took out a couple of bags with summer-y yarns that in my opinion could be used for something wearable in Florida. And I promised myself that I won't be working on anything else till I finally use these yarns.
It was pretty obvious from the beginning that I had to make something with stripes if I wanted to use this Peria yarn. I didn't have equal quantities in different colors so it took me a while to come up with a stripe combination that would use more yarn in one color and less in another.
Since I made several rather big swatches I knew that this yarn doesn't keep any shape or form whatsoever. It needed structure. Lots and lots of structure. Just seams or even full-fashioned shoulders were not enough. Lately I became attracted to saddle shoulder construction. I made a cardigan using it and I loved the fit. The problem with it though - it is tricky and all calculations must be done really well for sleeves to fit with the body parts. Now multiply the difficulty level by two because it was supposed to be knit with stripes!!!
I found a pattern for a t-shirt with a saddle shoulder in an old Phildar magazine. My gauge was different, so I used the biggest size. My colors were different so I used different stripes. Added a few rows of ribbing at the bottom. Otherwise I mostly followed this pattern.
The process of knitting was a lot of fun. I think both sides of the fabric look equally well - the purl side even more than the knit side. Like in the original pattern I ended up using the knit side for sleeves and the purl side for the body.
The seaming was a nightmare. No, nightmare is too mild a word to describe what I went through. It was a pure torture.
I was sick with some kind of virus and spent three days on my sofa trying to put this thing together. The result is not perfect (look at this back - it is a bit crooked).
All the while I was asking myself the same question: why cannot I just go to a store and buy a t-shirt for 5-10-15 dollars, wear it, and then put it in a laundry basket, like normal people do? Why do I need to spend an insane amount of time on something rather flimsy and stretchy that would require hand washing and drying flat?

But I like this one. It is roomy and airy, right for our Floridian winter (and probably summer as well).
Unfortunately, I am left with quite a lot of leftovers that I cannot just throw away. So in near future I'll have to make something with them, combining with more remnants of my previous projects.
In conclusion:
Knitting stripes is fun but must be avoided if possible.😎😎😎

Monday, June 6, 2022

Experiments

After my long and fruitful romance with intarsia I moved to fair isle knitting. It wasn't difficult - they both involve working with many balls of different colors. 

But first, I wanted to use intarsia and fair isle in one project (call it a "fusion" project:)))). I always wanted to try a sweater with one pattern that can be seen through another pattern, sort of "bleeding" through. There was a sweater in a Rag and Bone collection made in this technique but I don't buy sweaters, remember? Then I saw a similar pattern in an old Anny Blatt.

The fact that it was a man's sweater couldn't stop me. 

Do you start working on a project as soon as you figure out what you are going to make? You see something and you want it like yesterday, wondering why you've never felt this need before. You are itching to pick needles, some yarn, and start going. Sort of "new project" fever (is there a real name for this "disease"?). Does this sound familiar? I have it every time when I see something that I really truly like. And every time I have to make myself slow down and think about my choices. Why? Because I know from experience that when I dive into a new project right away without good ground work, I almost certainly fail. 

First of all, this new project of my choice must have a place in my wardrobe. I need to visualize how I am going to wear it and with what.

I also need time to compute and check everything, plus I have to pick a yarn that could be used for it. Sometimes this preparation process takes years like with this particular sweater. 

I wanted to replicate the fair isle/intarsia mix and I didn't mind the fair isle pattern itself. What I didn't like was the sweater's construction - too bulky in some areas, not well fitting, straight shoulders (beware of the patterns in which you cast off all shoulder stitches at once - these shoulders won't look good on you!). There were asymmetrical cables on the body and sleeves that I decided to ditch immediately (you cannot even see them in the picture, and I think that they would distract from the colorwork and make the final look too busy).

Instead of the Anny Blatt's design I decided to use a sweater pattern from Phildar New Classic again (after my success with this intarsia cardigan it became my trusty companion) because I wanted a certain fit: not too long or tight, and not too bulky either.

The main yarn - brown - is from ColourMart 4/14 NM dk wt angora/lambswool,  the rest - all kinds of yarns from my stash. They are all different but they have the same gauge, and work well together. If someone tells you that you cannot use different kinds of yarn in one project - let them look at this sweater (and this cardigan, and this also).

The actual knitting went faster than I hoped for. Since my gauge was different, I had different number of stitches on my needles and I couldn't possibly faithfully follow the colorwork pattern so I had to improvise, then improvise more, and keep improvising till the end.

A little explaining footnote.

It might look like I am a big fan of improvisations in knitting because I describe it quite often when I talk about the process. I have to set the record straight - I don't like when I have to do it. I always have a very detailed plan before I start making something and I prefer to stick to this plan. Why would you need a plan otherwise? And this is the reason for a long delay before the idea of a garment and its execution - I need to create a good action plan. I don't knit for the process (well, process is important but it is not the best part), I knit for the result and I want to get what I want at the end, not whatever happens to appear from my needles. 

So to make my improvisations more "regular", to organize and put some order in them, I made a magnified copy of the fair isle part which allowed me to make changes right on the grid. Plus I had to reverse the whole thing for the back to have a mirroring effect (you cannot do it mentally - the design is too complicated, you need an actual picture for a referral).


 As for the sleeve (there is a colorwork pattern on one sleeve only), I had to proceed at my own risk - my numbers were totally different, so I just used the same fair isle stripes in varied lengths as on the body.

Working with ColourMart yarn was a pleasure (it almost always is which is why I keep buying yarn from this store). All pieces became soft and a bit fuzzy after washing and blocking . And then I put them all together and discovered my two big mistakes.

First - the neck opening was too tight for my head (!!!!). I could squeeze it through without glasses, but I couldn't have anything around the existing not very big neckhole so the originally planned ribbing was not happening.

My second mistake was that I forgot to make the back longer than the front. I am getting more and more stooped with years and the back of my sweater would always hike up and stick out and I would need to constantly check and rearrange it unless something clever is done with the sweater's construction. This sweater is not long enough to compensate for the lack of length difference between back and front. And It is not tight enough to hug my body. I was so into the intarsia/fair isle combination, that I simply forgot to add some rows at the beginning of the back stockinette, and compensate for the difference by short rows at the front.

Anyway, the first problem had a solution. Instead of a ribbed neckband I made a ribbed collar. Somehow it improved the outlook proportion-wise. I think that even if I made a normal size neck hole, with a collar this sweater looks better, more balanced.

As for the second problem, nothing could be done. It is what it is and I have to live with it. 

If you are wondering how to get the pattern on a sleeve to match the ones on the body, that's simple. You need to start the armhole decreases for a sleeve at the same time as for the body. Which is why you need to make the body first and then carefully measure the length of your future sleeve to the armhole. This way you can calculate where to start the sleeve colorwork so the decreases for the sleeve's top will be at the same row that the decreases for the armholes.


My next project was supposed to be an all fair isle sweater. I saw it many years ago in Phildar magazine and was dreaming about making it one day for myself. Last year in Scotland I finally bought all these beautifully colored yarns from Clare @wee-county-yarns

One more footnote, about the yarn

This Scottish yarn - JC Rennie Supersoft Lambswool - is a marvel. It is very thin, so the garment is light, not heavy but still warm. It is very sticky so if you are a fan of steeking - it will work wonderfully for you. After washing and blocking it fluffs up a bit, becomes smooth and even. Lovely yarn, I will buy it again!

I am not a steeking fan though (because of the final fit as I've already explained several times), so my sweater was made in pieces. But this time, since so much work was going to be involved into making it, I wanted to be sure that the final fit would be exactly as I wanted it to be.

I started looking for different possibilities of making the back longer while knitting the whole sweater in fair isle technique. The problem is that you cannot just knit the back longer than the front. The colorful stripes on back and front have to match when you seam the sweater together.

One possibility is to make the ribbing longer at the back and then leave the back and front ribbing unsewn, as a slit or vent. That couldn't work in this particular case - my yarn was fingering weight, I was using US 0 and 1 needles, so the ribbing would have looked flimsy and sloppy.

Instead I decided to make the pattern myself to fit my body. Yes, apparently I've got too much time on my hands. I never wanted to even touch pattern making - too many numbers, too complicated for my taste. Plus my brain is weirdly unresponsive and just shuts down when I try to imagine something three dimensional. Brr, total disaster!

You wouldn't believe how many hours I spent watching YouTube videos, reading books (yes, in plural) and websites, searching the Internet. I drew and cut several patterns from paper (like a pro would!), cut them from fabric (!!!), basted,  and then tried on. I used my favorite t-shirts to figure out the best measurements. I didn't start till I knew what I was doing… but actually, I didn't. I wasn't sure that all these drawings and calculations would work and was really nervous about the end result. Probably, this is the reason for finishing it faster than normal for a fair isle sweater from a fingering yarn made with US 0 and 1 needles.


Have you felt this feverish rush to finish a knitting project and finally try it on (pretty much like the one at the beginning of a project, but stronger)? I feel it every time. And again, every time I tell myself not to be in a hurry, and take my time with finishing touches. Because they can make or break your work. Isn't it strange that our instinct makes us sprint at the very beginning and at the end, at times when you have to keep your calm and 1) do all calculations needed; or 2) do all the finishing needed.

Yesterday I put on my fair isle sweater (I call it Enchanted forest) for the first time. And was happy to see that my efforts were not in vain. I got exactly what I wanted.


My shoulders decreases are 2 cm higher for the back which adds length to it, makes the back stay in place, and it isn't particularly noticeable if you don't scrutinize my shoulders. The neck opening is big enough for my big head.

I am particularly pleased with the armholes shapes and the sleeves. They are roomy enough, not too tight but not too big and shapeless either. I know that the most fashionable sweaters nowadays must have long, big sleeves. But I am planning to wear this sweater under a coat or jacket, and big sleeves would scrunch up and crash under another garment, making me uncomfortable and unable to use my hands (I use my hands all the time!).

And this is the story of the bluish-green fair isle sweater. Now I have a lot of leftover yarn in all these bright beautiful colors. I might make a vest, or a hat, or a scarf with it, who knows?

But first I need to make something very simple, without intarsia or fair isle, just monotonous stockinette. And I need to tweak my (!!!) sweater pattern, so next time I won't be a nervous wreck but a self-confident knitter.